A lot of bands reach the same point at once. The songs are tight, the social graphics look good, the stage plot is sorted, and the bass drum still has a blank front head that does nothing for the brand or the sound.
That front head matters more than most buyers expect. It’s the biggest visual surface on the kit, but it’s also part of the instrument’s voice. A custom bass drum head isn’t just a print decision. It affects resonance, port placement, tuning behavior, microphone access, and how polished the kit looks under lights or in photos.
For anyone deciding what to put on a bass drum head, whether a custom head is worth it, or how to order one without hurting bass drum tone, the right answer is to treat sound and design as one project. The strongest custom heads do both jobs at the same time.
Your Bass Drum Head Is More Than Just a Logo
A custom bass drum head usually starts as a branding decision. A band wants the logo cleaner, a teacher wants a school mark on the front of the kit, or a touring act wants the drum riser to look finished from the crowd. That’s all valid. But the mistake is treating the resonant head like a poster.
It isn’t a poster. It’s a vibrating surface that shapes bass drum tone, stage presence, and microphone options.
What buyers usually overlook
The front head changes how the drum breathes. Even before tuning, the choice of head style, whether it’s ported, and how the artwork is laid out will affect the final result. A design that looks perfect on a flat mockup can become harder to read if the head ends up wrinkled, over-tightened, or cut with a poorly placed port.
That matters for standard kits and for larger-format setups like custom marching heads, where visual impact is even more obvious from a distance.
Practical rule: The best custom head design starts with the sound goal, then builds the artwork around it.
Why a custom head can be worth it
A well-made printed head does two jobs at once:
- It finishes the kit visually. The bass drum becomes part of the band’s identity instead of empty stage space.
- It supports functional setup choices. Port placement, clean tuning, and artwork scaling can all be planned together.
- It avoids the cheap look of afterthought solutions. Stickers and improvised add-ons often look uneven and can interfere with how the head performs.
A buyer deciding whether a custom head is worth it shouldn’t think in terms of “looks versus sound.” The better question is whether the front head can help the kit sound intentional and look professional at the same time. When it’s chosen correctly, it can.
How Your Custom Head’s Material Shapes Your Sound
The base head is the foundation. Printing matters, but the material underneath the artwork is what determines whether the drum speaks openly, stays controlled, or feels choked before a microphone ever gets involved.
A good custom head should preserve the natural behavior of the head. Thick add-on films and decal-style approaches can work against that by adding extra mass in a way the drum didn’t ask for. Direct printing onto the head surface is different. It keeps the head looking custom without turning the design into a layer that fights the drum.

Single-ply and double-ply feel different on the kit
The choice isn’t only about durability. It’s about what the buyer wants the front of the drum to contribute.
| Head type | What it tends to do | Best fit for design buyers |
|---|---|---|
| Single-ply | More open feel, longer ring, clearer shell character | Players who want a more resonant, classic, or roomy front-head response |
| Double-ply | More control, stronger low-end focus, fewer extra overtones | Buyers who want a punchier, more contained front head with a modern feel |
That difference matters when the custom graphic is going on the resonant side. The artwork doesn’t replace the acoustic identity of the head. It rides on top of it.
Shell size changes what the printed head will feel like
Head material never works in isolation. Drum depth changes the whole equation. A deeper bass drum shell produces more harmonics and inharmonic overtones and tends to sound fatter, while shallower shells are brighter and lighter, as discussed in the shell-depth reference at Drummerworld.
That has a direct design implication. A buyer ordering a printed head for a deep shell may want cleaner, simpler artwork that still reads well on a drum with more low-end bloom and longer presence. A shallower drum often suits a sharper, more immediate visual concept because the sound itself is quicker and more direct.
Printing should support the tone, not fight it
A custom head should behave like a drum head first. That’s why the printing method matters.
- Direct-to-surface printing keeps the head closer to its intended response.
- Sticker-style solutions can deaden feel and make the front look less integrated.
- Artwork choice also matters visually under tension. Fine details, gradients, and logo placement should account for how the head will sit once mounted.
Buyers comparing options can get more context from these insights from Custom Bass Drum Head, especially when the question is how material choice affects both print quality and response.
The smart purchase isn’t just “Which head prints best?” It’s “Which head still sounds like a drum after it’s printed?”
Tuning Your Resonant Head for Tone and Visuals
Soundcheck starts in ten minutes. The front head looks great in the case, but once it is on the drum, a slight pull on one side can turn a clean circle into an oval and make the whole kit look off before anyone hears a note. Good resonant-head tuning fixes both problems at once. It gives the drum a controlled front-end response, and it lets the artwork sit flat, centered, and readable from the crowd.

A practical tuning sequence that also protects the look
Start with the batter head and bring it up evenly until the wrinkles disappear. From there, add a small, even increase at each lug. Then bring the resonant head to its lowest clean tension and raise it in matching increments, always working across the drum instead of chasing one problem spot. That gives the shell a fair chance to speak, and it keeps the printed face from getting pulled out of shape.
In many setups, the resonant head works well slightly higher than the batter. That usually gives the drum a fuller note, a cleaner rebound of air, and a front head that stays smooth without feeling over-stretched. There is no universal note target for bass drum tuning, and many kick drums do not present a single pitch clearly enough to make that a useful goal. For a printed resonant head, the better target is even tension, controlled sustain, and a graphic that still looks intentional under load.
What to watch while tightening a printed front head
A printed head shows tension problems fast. Plain white heads can hide small mistakes. Artwork does not.
Use this checklist while tuning:
- Check the artwork edge first. If a circle, border, or block of text looks pulled to one side, one area is carrying more tension than the rest.
- Clear wrinkles evenly. Bring the whole head up together. Do not force one lug harder just to flatten a local ripple.
- Step in front of the drum. The audience reads the design straight on, not from the throne. Judge smoothness and logo alignment from that angle.
- Watch the collar area. If the design sits too close to the rim line, minor seating changes become much more visible.
That visual feedback is useful in the shop and on stage. It tells you where the head is fighting the hoop, where the shell edge may need attention, and whether the design placement was realistic for the amount of tension the drum wants.
Tone choices change the way the graphic reads
A lower resonant tension usually gives a softer, longer front-end feel and a more relaxed look across the print. Raise it too little, though, and the head can show ripples that make even good artwork look unfinished. A higher resonant tension cleans up the face and can sharpen the drum’s response, but too much tension can thin the note and make the printed surface look strained.
This is one of the trade-offs buyers miss when they treat the front head as decoration. The design is part of the setup. Large centered logos usually tolerate small tuning changes well. Fine lines, perfect circles, and text placed near the edge demand more even seating and more care at each lug.
If port placement is part of the plan, read our drummer’s guide to bass drum ports before finalizing the tuning approach, since the opening changes both head feel and how the artwork presents.
What does not work well
Some problems show up again and again on custom fronts:
- Over-tight resonant heads can make the drum feel smaller and strip out useful low-end body.
- Loose but uneven tuning leaves visible waves through logos, type, and borders.
- Tuning by one reference lug only often produces a head that sounds passable at the throne but looks crooked from the room.
- Artwork pushed too close to the collar can distort once the head seats fully on the shell.
The best result is rarely the most extreme one. A good custom bass drum head looks smooth, speaks clearly, and supports the identity of the kit without asking the drum to behave unlike itself.
Strategic Porting for Your Custom Graphic
A front head often looks finished on the mockup, then the band asks for a port after approval because the engineer wants easier access. That last-minute change usually costs something. The drum loses part of its front voice, and the artwork loses part of its focal area.
Porting works best when it is planned as part of the head, not added as a repair to the design.

What a port actually does
A port changes the way the resonant head releases air. In practical terms, that usually means easier microphone placement, less lingering sustain, and a quicker, drier response out front. It also gives more room for internal control if the drum needs light muffling for stage or recording use.
The size of the opening matters. A small offset port keeps more of the head working and preserves more printable area. A larger cut gives engineers more access and can make the drum feel more controlled, but it also reduces the contribution of the front head and takes a bigger bite out of the graphic.
That trade-off matters in a custom shop. The customer is not only choosing a sound. They are choosing how much of the visual face stays intact.
Placement affects both tone and layout
I rarely recommend deciding port location from the artwork alone. Lower side placement is common because it keeps the center image cleaner and still leaves a practical access point for a mic or hand adjustment inside the shell. Shift that opening too high or too far inward, and the design can feel awkward even if the drum sounds fine.
The reverse happens too. A centered logo can look perfect in the proof, but if the port ends up cutting through the strongest visual element, the head starts to look like it was changed halfway through the job.
Here is the practical view:
| Port position | Visual effect | Tonal implication |
|---|---|---|
| Lower side placement | Keeps center logo more intact | Good balance of appearance, access, and controlled resonance |
| Offset around 3:30 or 4:00 | Protects focal artwork and usually feels intentional | Common choice for punchy response with easy miking |
| Center cut | Disrupts logos, text, and symmetrical layouts | Best only when the whole design is built around the opening |
How to place a port without compromising the design
The cleanest custom heads are planned with the hole in mind from the start. That usually means one of three approaches:
- Reserve negative space where the port will live. This keeps the cut from clipping text, borders, or key logo shapes.
- Hide the port inside the composition. Dark blocks, badge shapes, and illustrated elements can absorb the opening better than open background areas.
- Lock the port location before approving typography. Small type near the lower edge is the first thing that gets mangled by a late change.
Players who want the practical side before approving a mockup should read this drummer’s guide to bass drum ports.
A well-placed port looks intentional from the crowd and useful from the mic position. That is the target.
Damping Methods That Do Not Hide Your Artwork
A custom front head loses a lot of value when the drum gets stuffed in a way that makes the setup look unfinished. The common problem isn’t damping itself. The problem is damping that ignores the reason the head was customized in the first place.
A good-looking bass drum should still be controlled. It just shouldn’t need visible clutter to get there.
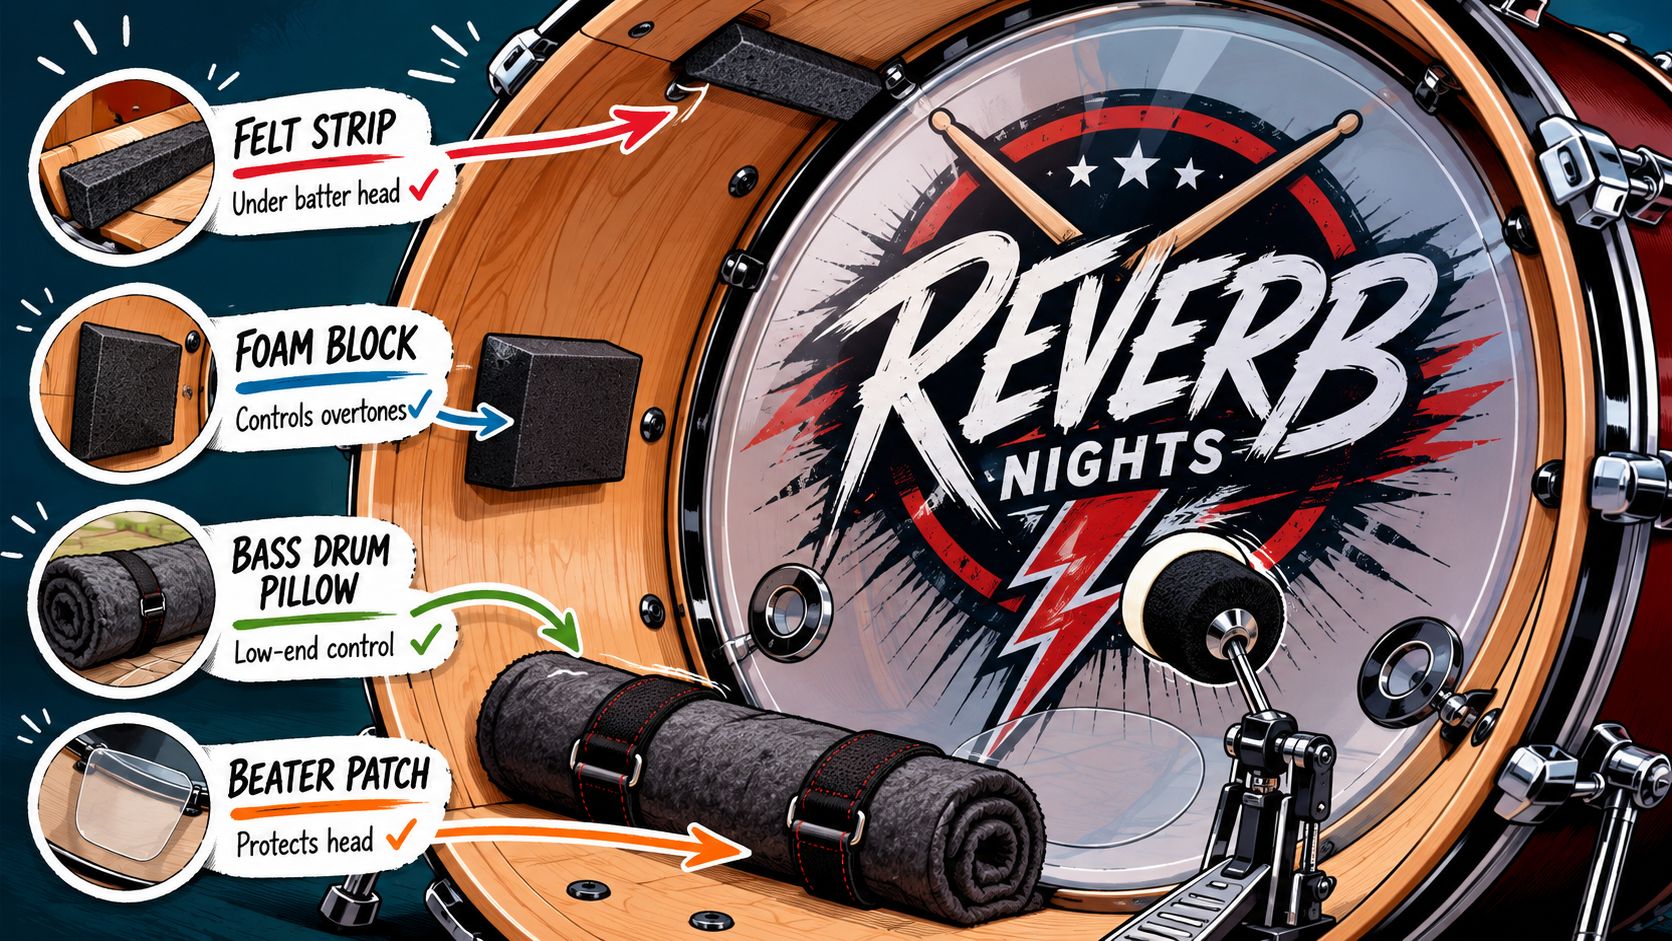
Keep control inside the shell
Internal damping is usually the cleanest answer for a custom printed resonant head. It manages excess boom while leaving the front of the drum readable on stage and in photos.
The most practical options are:
- Low-contact internal pillows that rest at the bottom of the shell and lightly touch one or both heads.
- Small foam systems that reduce ring without taking over the drum.
- Minimal contact strips or pads for players who want some control but still want the front head to move.
What works visually and what doesn’t
There’s a simple test. If the audience notices the muffling before they notice the artwork, the setup is working against itself.
These choices usually age well:
- Hidden damping that leaves the resonant head clean
- Port-compatible internal control that can be adjusted between studio and stage use
- Moderate contact instead of packing the shell full
These choices usually don’t:
- Blankets pushed hard into both heads
- Loose material shifting inside the drum
- External fixes that distract from the printed front
Clean front head, controlled interior. That’s the look that reads as professional.
Match the damping to the purpose of the head
A band using the bass drum as a visual centerpiece often benefits from less visible intervention and more careful internal adjustment. A rehearsal-space setup can get away with almost anything. A stage kit can’t.
For inspiration on how strong front-head presentation looks when the drum stays visually clean, it helps to browse a portfolio of custom drum heads. The common thread is simple. The artwork stays visible because the control choices stay out of sight.
Micing Techniques for Your Branded Drum Kit
Microphone placement should follow the design and setup choices already made on the front head. A ported custom head invites one set of options. A full resonant head asks for another. Neither is automatically better.
The useful question is what the kit needs to deliver. Some setups need more attack. Others need more body and front-head resonance.

Three common approaches
| Technique | What it captures | Best match |
|---|---|---|
| Inside the drum | More beater attack, less room, tighter shape | Ported heads and modern punch-focused setups |
| Outside the drum | More sustain, low-end bloom, more natural front-head behavior | Full front heads or players who want resonance preserved |
| Inside plus outside | Blend of definition and body | Studio setups where flexibility matters |
Ported and non-ported heads ask for different decisions
A large port or removed front head can make microphone placement easier when the target is a tighter, more articulate kick sound. As noted earlier, engineers report that this kind of setup can remove a substantial amount of unwanted overtone content, which is part of why it’s common in aggressive styles.
A full resonant head creates a different picture. It often rewards front-of-head placement and a little more patience with room interaction. That’s especially true when the custom artwork is part of a polished studio or video setup and the player wants the kit to look complete on camera.
A simple decision guide
- Choose inside placement if the drum is ported and the mix needs quick attack.
- Choose outside placement if the front head is unported and the goal is fuller resonance.
- Choose both when the setup needs attack for definition and a second source for body.
The branded head doesn’t just change how the drum looks. It influences how an engineer can approach the drum in the first place.
From Design Mockup to Downbeat
The strongest custom bass drum heads work because every choice supports the next one. The head material sets the feel. Tuning determines whether the graphic sits cleanly and the drum speaks properly. Porting shapes both the artwork and the microphone plan. Internal damping keeps the tone controlled without sacrificing the front-of-kit presentation.
That’s why buyers usually get the best result when they stop treating the front head like a separate decoration project. It’s part of the instrument. A custom head can absolutely improve how the kit presents on stage, but it also affects the practical details that decide whether the drum sounds finished or frustrating.
For anyone weighing what to put on the head, whether to add a port, or how to make the artwork fit the actual drum setup, the smart move is to design with the intended use case in mind. Studio kick, touring kick, worship kit, school ensemble, and branded event rig all want slightly different answers.
For a clear starting point on sizing, artwork prep, and the ordering process, it helps to review this guide to designing your custom drum head.
A custom bass drum head should look right under lights and sound right at the first downbeat. Custom Bass Drum Head makes that process straightforward with browser-based mockups, direct printing onto premium heads, flexible sizing, and precise port placement so the final head fits the kit visually and acoustically. Upload the artwork, choose the head style, and build a front head that matches the band’s sound as well as its identity.