
A marching line can sound excellent and still look unfinished from the stands. That usually happens when the bass line reads as five separate drums instead of one visual unit. For a band director, that's a missed opportunity. The front ensemble, uniforms, and drill may already support the program identity, but the bass line is often the largest moving graphic on the field.
A custom marching bass drum head solves a very specific problem. It has to stay legible at distance, hold up outdoors, and fit a lineup of different drum diameters without making the design feel inconsistent. That's very different from a small club kit head where the viewer is standing a few feet away.
Why Your Marching Line Needs a Unified Look
Judges, parents, and spectators rarely see individual design decisions. They see the total impression. Under stadium lights, a matched bass line with clean logos and consistent school colors communicates organization before the first downbeat. A random mix of aging stock heads, off-center logos, and mismatched shades does the opposite.
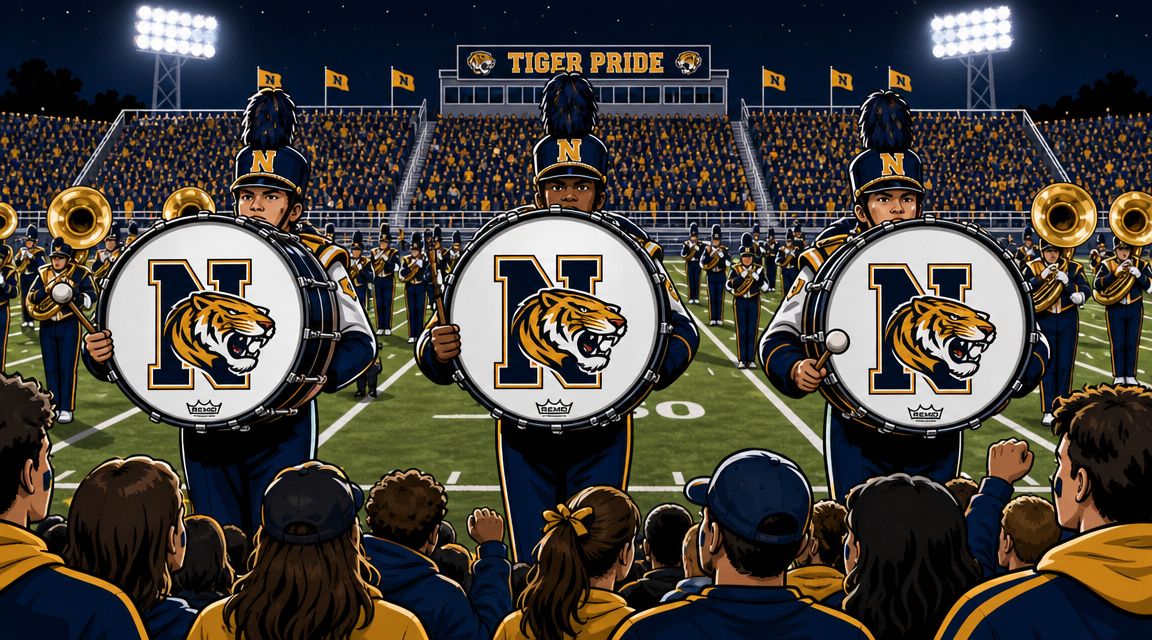
One high school program ordered a matched set of five heads in royal blue and gold with a bold interlocking logo centered on each drum and player numbers tucked into the lower corner. The design worked because every drum felt related, even though the diameters changed across the line. From the press box, the battery read as one statement instead of five separate surfaces competing for attention.
Marching heads aren't just larger kit heads
A marching band bass drum head lives in a different environment than a standard kit head. It has to look sharp in daylight, under stadium lights, and during movement. It also has to survive transport, weather shifts, repeated handling, and a full season of field use.
That changes the design priorities:
- Distance matters: Fine details that look impressive on a laptop often disappear in the stands.
- Scale matters: Large surfaces reward bold logos, simple lockups, and strong contrast.
- Consistency matters: The line should feel branded as a unit, even when every drum size is different.
Practical rule: If the logo isn't clear from the top row of bleachers, it isn't ready for a marching head.
This tradition has real depth. Purdue's “World's Largest Drum,” commissioned in 1921, cost around $800, or about $11,838 in today's money, according to the Indiana history account of the Leedy Manufacturing Company and Purdue's drum. The point isn't nostalgia. It shows that branded bass drums have long been tied to institutional identity and spectacle. What used to require a one-off showpiece is now accessible through modern browser-based customization.
For directors looking at visual references before committing, it helps to browse photo-quality drum heads and evaluate what reads cleanly at scale. The strongest marching bass drum heads don't try to say everything. They say one thing clearly.
Choosing the Right Size and Material for Field Durability
The most expensive mistake in this category isn't usually the artwork. It's ordering the wrong size, or choosing a graphic method that doesn't hold up once the season starts.
How to size a marching band bass drum head correctly
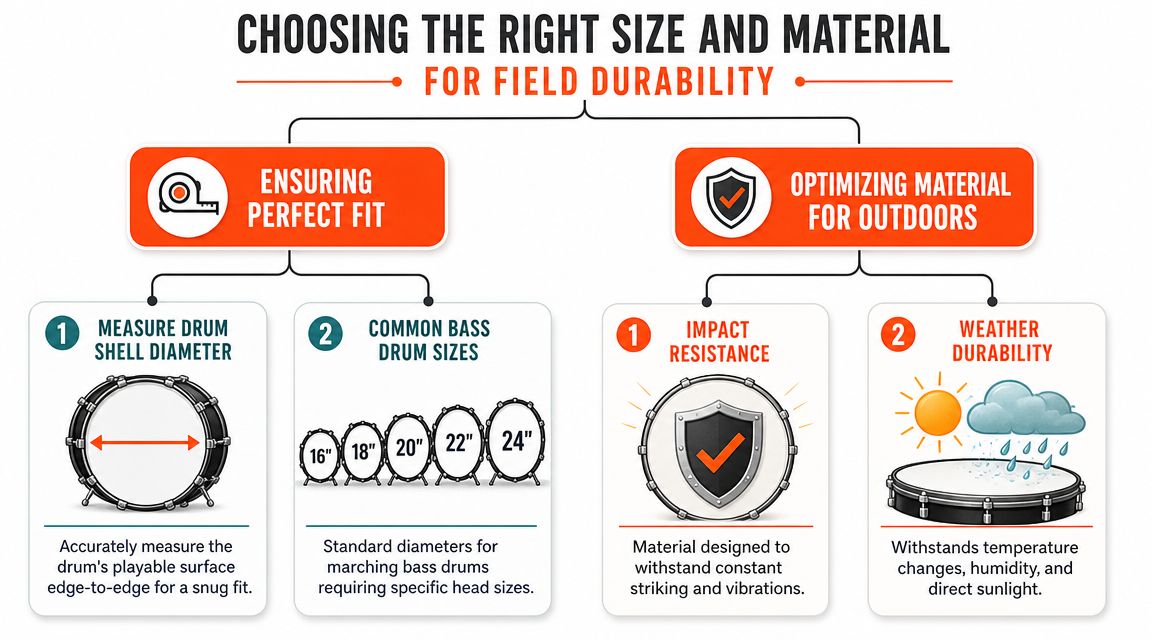
Marching bass drums are part of a standardized size range built for visibility. Custom marching heads are available from 14 inches to 32 inches, as noted in this marching drumhead sizing reference. For most school lines, common sizes often include 16, 18, 20, 22, and 24 inch drums, which makes matched sets straightforward if measurements are confirmed carefully.
Directors should measure the actual drum diameter the head must fit, not estimate from memory and not rely on an old inventory spreadsheet unless it has already been verified.
A clean process looks like this:
- Measure edge to edge across the shell. Use the playable diameter, not the outside span of hardware.
- Check every drum individually. A five-drum line may follow the expected progression, but assumptions cause wrong orders.
- Match each graphic to each size. The same logo can stay centered across all heads, but spacing needs to account for the changing diameter.
For additional Custom Bass Drum Head measurement tips, directors should confirm dimensions before artwork is finalized. That avoids a common chain reaction where proof approval happens first and sizing errors are discovered later.
What works in outdoor conditions
In marching use, durability has less to do with choosing the thickest possible printed surface and more to do with how the artwork is applied. The resonant head doing the visual work usually isn't taking direct stick impact, so the key issue is whether the print becomes part of the head or sits on top like a film.
A direct-to-head print is the safer choice for outdoor programs because it avoids the typical problems associated with decal-style graphics:
| Method | What usually works | What usually fails |
|---|---|---|
| Direct print onto the head | Clean surface, no lifted edges, better long-term appearance | Less forgiving if the artwork file is poor |
| Applied film or sticker | Can look acceptable at first | Edges can peel, bubble, or telegraph wear over time |
A marching head doesn't live in a climate-controlled showroom. It rides on trucks, sits through delays, and goes from heat to humidity fast.
That matters even more for custom marching bass drum heads used all season. The head needs to stay presentable through loading dock contact, rehearsal fields, and wet-weather interruptions. A graphic that starts lifting at the edges doesn't just look bad. It makes the whole line look poorly maintained.
Matched sets need material consistency too
If a program is ordering multiple heads, consistency across the set matters as much as the logo. The print finish, background density, and surface appearance should feel coordinated from smallest bass to largest. That's what gives the line a unified block of color and branding instead of a patchwork effect.
Designing a Head That Pops from the Press Box
The most common design failure is simple. The artwork looks sharp on a screen and collapses on the field.
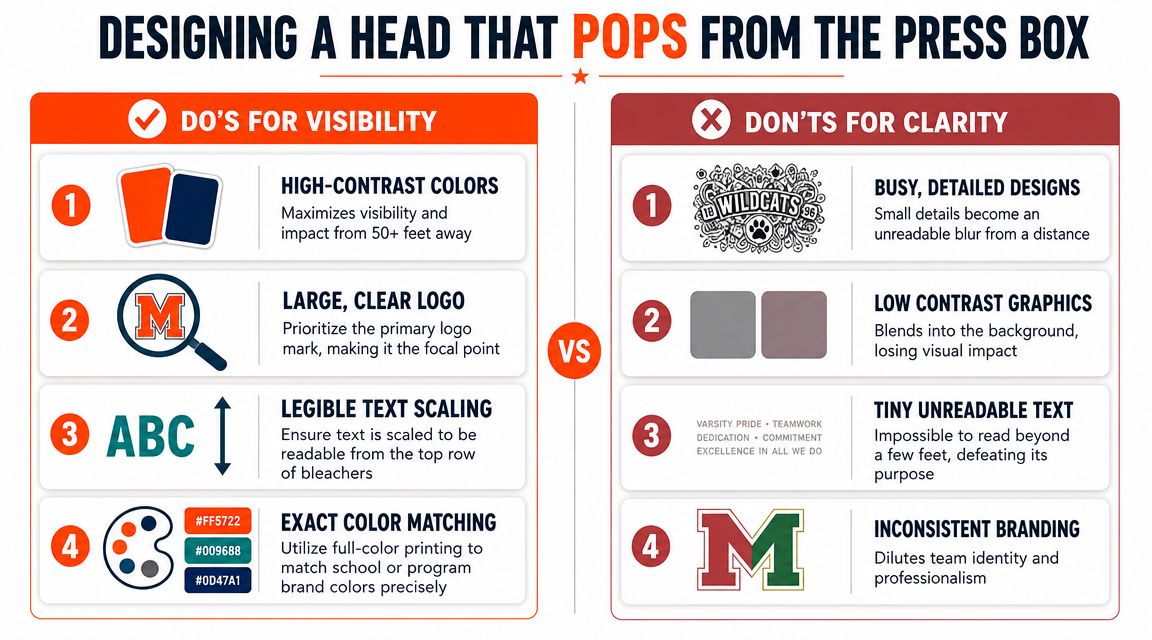
A crest with thin outlines, multiple text tiers, and subtle color shifts may be perfect for stationery or uniforms. It usually isn't right for a marching bass drum head. At field distance, especially under stadium lighting, contrast flattens and fine detail disappears.
Use the press box test
The design should communicate in a glance. A strong head usually has one focal element, one clear background decision, and no extra detail that competes with the logo.
Here's the difference between a field-ready design and one that tends to fail:
- Field-ready: Bold mascot mark, strong school-color background, minimal text, generous spacing.
- Usually weak: Full seal, motto, small date lines, thin borders, layered shadows, multiple secondary marks.
Player numbers can work well, but they should stay secondary. The best placement is often tucked into a lower corner where they don't fight the logo. They help staff and spectators identify players while preserving the matched-set look.
Design checkpoint: If a director has to explain the graphic for someone to understand it, it's too complicated for the field.
Color and file setup matter more than most buyers expect
Marching contexts reward high-contrast design. School colors should be used intentionally, not just included because they exist in the brand package. If the logo and background are too close in value, the head can look flat from distance even if the color match is technically accurate.
Full-color printing is beneficial. A program can match exact school or program colors without being limited to a small preset palette. That gives directors more control over whether the bass line reads as clean, bold, and on-brand under different lighting conditions.
For print production, the file standards are straightforward and important. Raster artwork should be prepared at the full printed size at a minimum of 300 DPI in CMYK, and vector files are preferred because they scale cleanly without losing sharpness, as explained in this guide to custom bass drum head printing requirements.
A practical hierarchy looks like this:
| File type | Best use | Main concern |
|---|---|---|
| Vector | Logos, line art, wordmarks | Requires the correct source file |
| High-resolution raster | Photos or painterly artwork | Must be full size, 300 DPI minimum, CMYK |
| Low-resolution web image | Almost never suitable | Soft edges and poor enlargement results |
Directors who want help creating stunning drum head visuals should simplify first and decorate second. On a marching head, clarity wins.
From Concept to Field a Band Director's Ordering Guide
A realistic school order usually starts with a five-drum bass line and a deadline that feels farther away than it really is. The director wants matched branding in school colors, needs each diameter confirmed, and has to get sign-off from staff before the first performance.

A practical five-drum scenario
A typical lineup might use 16, 18, 20, 22, and 24 inch heads. The first decision isn't the artwork. It's confirming that each drum in the battery matches that expected progression. Once the sizes are locked, the director can move to the graphic package.
The next step is getting the right logo file. The school office often has a version of the mark that works for newsletters or social graphics, but not for large-format print. The better move is to request the original vector logo or a production-ready file from the program's marketing contact, booster designer, or district communications office.
Then come the design calls:
- Center the primary mark or offset it? Centering usually creates the cleanest look across a matched set.
- Use one shared design or vary each drum? Shared design is stronger for consistency.
- Add player numbers? Useful, but keep them quiet and out of the visual center.
- Include a port? If the line uses amplification or a specific mic setup, decide that before proof approval.
One option for this workflow is Custom Bass Drum Head, which lets buyers upload artwork, position elements in a browser-based mockup, and specify details such as port placement before production. In a school setting, that matters because the director, percussion staff, and boosters can review the same proof before the order is locked.
Proof approval is where expensive mistakes get caught
Most ordering errors happen in the proof stage, not the idea stage. In this stage, directors should stop looking only at the artwork and start checking the production details.
Review these items before approval:
- Each head size matches the correct drum.
- Logo scale feels balanced across all diameters.
- School colors appear consistent throughout the set.
- Player numbers, if included, stay readable but secondary.
- Port location aligns with the actual setup.
The easiest way to move from concept to production is to order custom heads for drummers only after everyone who needs to approve the design has reviewed the final mockup. That step saves more headaches than any last-minute redesign.
The strongest matched sets don't rely on five different ideas. They rely on one disciplined idea repeated well.
Planning Your Order and Caring for Your Investment
Timing matters more than most directors expect. A strong design approved too late still arrives too late.
Build your schedule around production reality
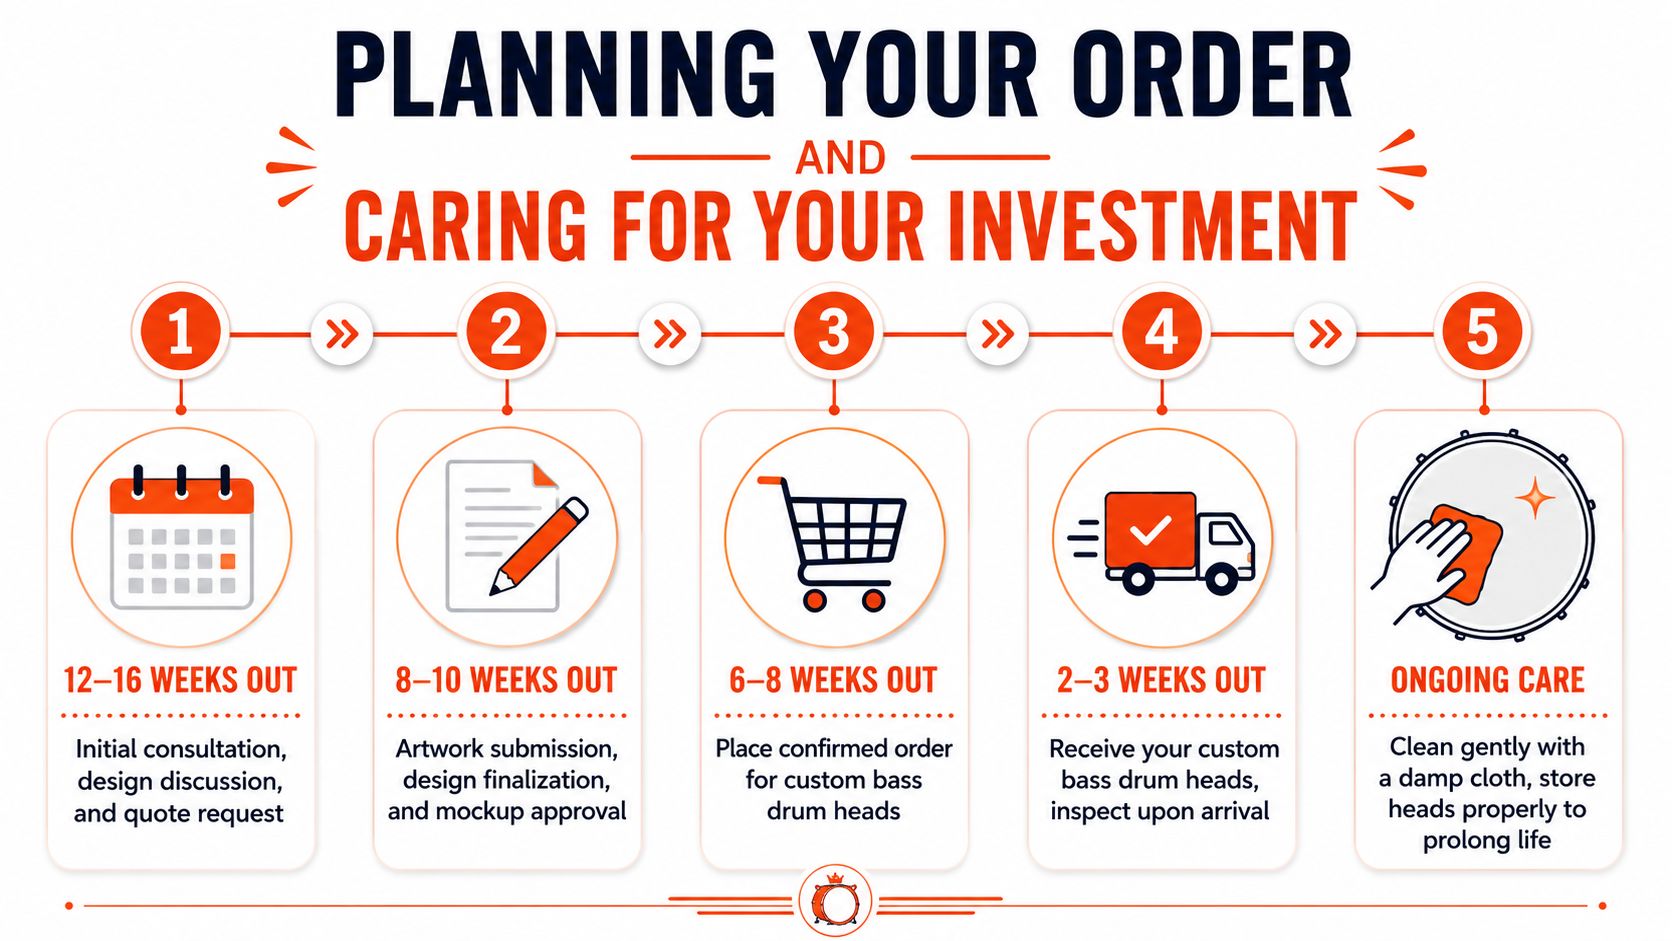
Production windows vary by order size. Small runs of custom heads often take 5 to 10 business days, while larger sets for a full drum line often take 10 to 14 business days, according to this note on custom head production windows and order size. Shipping time still has to be added after that.
For marching programs, that means the safe schedule isn't "order when the design is done." It's "finish the design early enough that production, shipping, inspection, and installation all happen before the first event that matters."
A practical planning sequence:
- Early planning: confirm sizes, branding, and decision-makers.
- Artwork phase: collect the correct logo files and settle color choices.
- Approval phase: check proofs against actual drum sizes and staging needs.
- Delivery buffer: leave enough room for shipping and any correction if a detail was missed.
Don't overlook mic ports and setup details
Port placement isn't a priority for every field show, but it matters for lines that run amplified setups or indoor percussion configurations. When the port position is chosen during ordering, the head arrives ready to fit the existing rig. That avoids cutting into the head later and risking a result that looks improvised.
The smartest approach is to decide port location based on the actual hardware and microphone placement the ensemble already uses. A visually balanced layout still matters, but it shouldn't force the staff to redesign the audio setup around the drum art.
Ordering habit that pays off: approve the visual layout and the functional setup at the same time, not in separate conversations.
Keep the heads looking clean through the season
Once the heads arrive, handling matters. Installation should be done carefully on a clean drum, with hardware checked before tensioning. During the season, staff should wipe the surface gently with a soft damp cloth and avoid harsh cleaners that can dull the print.
Transport is where a lot of cosmetic damage happens. Cases, padding, and disciplined loading protect the visual side of the drum as much as the shell. For programs balancing budgets, that care extends the useful life of the purchase and keeps the line presentation strong throughout the schedule.
For budgeting ahead, directors can view our drum head pricing before finalizing quantities and options.
Unify Your Sound with a Professional Visual Identity
A strong marching program doesn't separate sound from presentation. The audience doesn't separate them either. When the bass line carries a clear, consistent visual identity, the ensemble looks more disciplined, more intentional, and more prepared.
That's why custom marching bass drum heads are worth treating as part of the show design, not as an afterthought. The best results come from a few disciplined choices. Measure each drum correctly. Keep the artwork simple enough to read at distance. Use full-color printing to match school colors accurately. Order the set as a coordinated group so the smallest and largest drums still feel like one branded unit.
That last point matters. A matched set of custom marching bass drum heads gives the battery a unified face on the field. It turns five different drum sizes into one visual system. Under lights, from the press box, that kind of consistency reads immediately.
A marching band bass drum head should do more than fill empty space. It should support the same standards the staff expects from drill, tone, and uniform presentation. When the visual side is handled with the same care as the musical side, the whole program benefits.
A band that looks organized before it plays already has an advantage. If the goal is a cleaner field presence, exact school-color matching, and a matched set that holds up through the season, start with Custom Bass Drum Head.