The gig is tomorrow, the new custom bass drum head is already on the kit, and the mic is sitting on the floor like a reminder that looks can’t save a bad setup. The graphic is perfect, the logo reads clean from the crowd, but the port is sitting exactly where the old stock head had a different opening, and now the kick mic doesn’t sit where it used to. That’s the microphone placement guide problem for custom heads, the head and the mic are co-design choices, not separate chores.
A bass drum doesn’t care whether the artwork is clever or the print is expensive, it only cares about where the air can move and where the microphone can hear it. That’s why placement changes so much once a head is printed, ported, or left pristine for a front-facing look. The reader who’s buying or designing a custom head needs both the sound plan and the visual plan at the same time, because the port is part of the design, not an afterthought.
Why Your Custom Bass Drum Head Changes Everything
The first mistake is treating a custom head like a blank head with a logo on it. Once the artwork, port, and layout are fixed, the microphone no longer gets to live wherever the stock head made life easy. A printed front head with a port cut in the wrong spot can force a clumsy angle, a longer reach, or a compromise that looks tidy on stage but sounds uneven at the console.
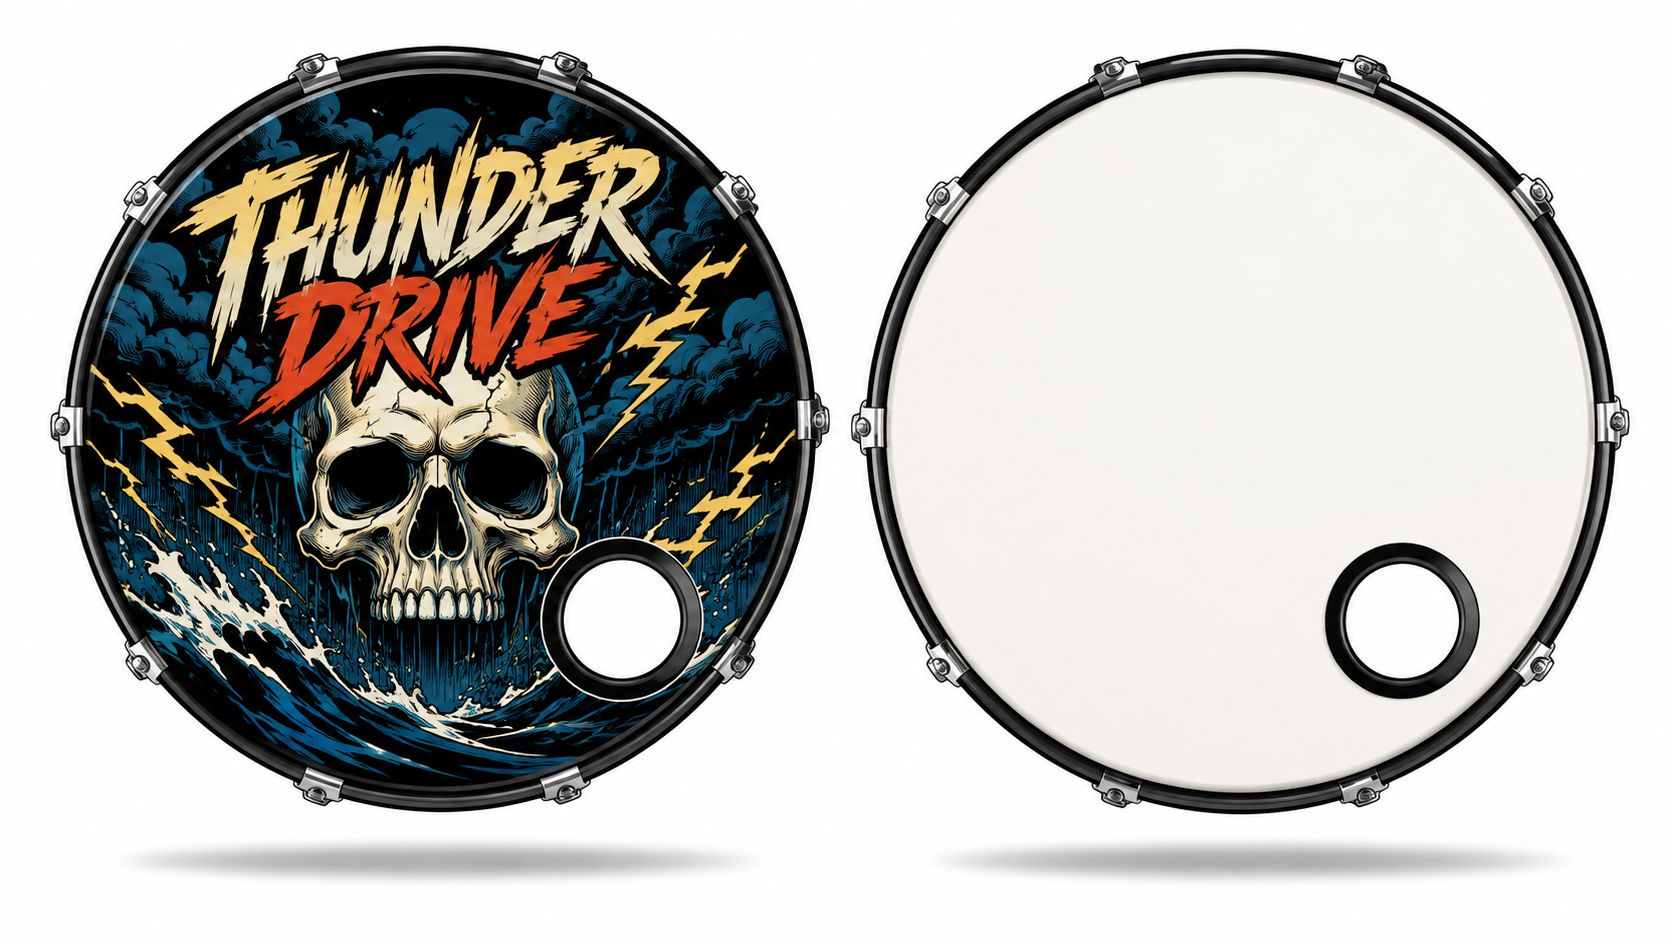
The port is part of the artwork layout
A custom bass drum head isn’t just visual branding, it’s a physical acoustic surface. If the port lands too close to the center, the mic path changes, the internal aim changes, and the kick sound often changes with it. If the port lands high or off to one side, the beater path and mic access can line up better, but the graphic has to be designed around that reality.
A smart buyer thinks about the mic before final approval, not after the print arrives. That means deciding whether the front head needs a port at all, and if it does, where the port should live so the logo still reads clearly. The wrong order is easy to spot on a stage, a beautiful head with a mic jammed into an awkward opening that looks improvised.
The practical payoff is simple. A head designed with mic access in mind usually gives the engineer a cleaner shot at the drum and gives the band a front-of-stage look that still works in the room. For a deeper look at how front heads affect tone as well as appearance, the best companion reading is bass drum tone and the way the head shapes it.
Practical rule: if the head is being designed for real gigs, the port should be treated like a functional design element, not a decoration detail.
Choosing the Right Microphone for a Custom Head
The mic family matters because different mics want different access. A big kick dynamic usually wants a more generous port and a stable position inside the shell. A smaller instrument mic can live in tighter spaces. A condenser belongs mostly in controlled studio work where the room isn’t fighting the drum.
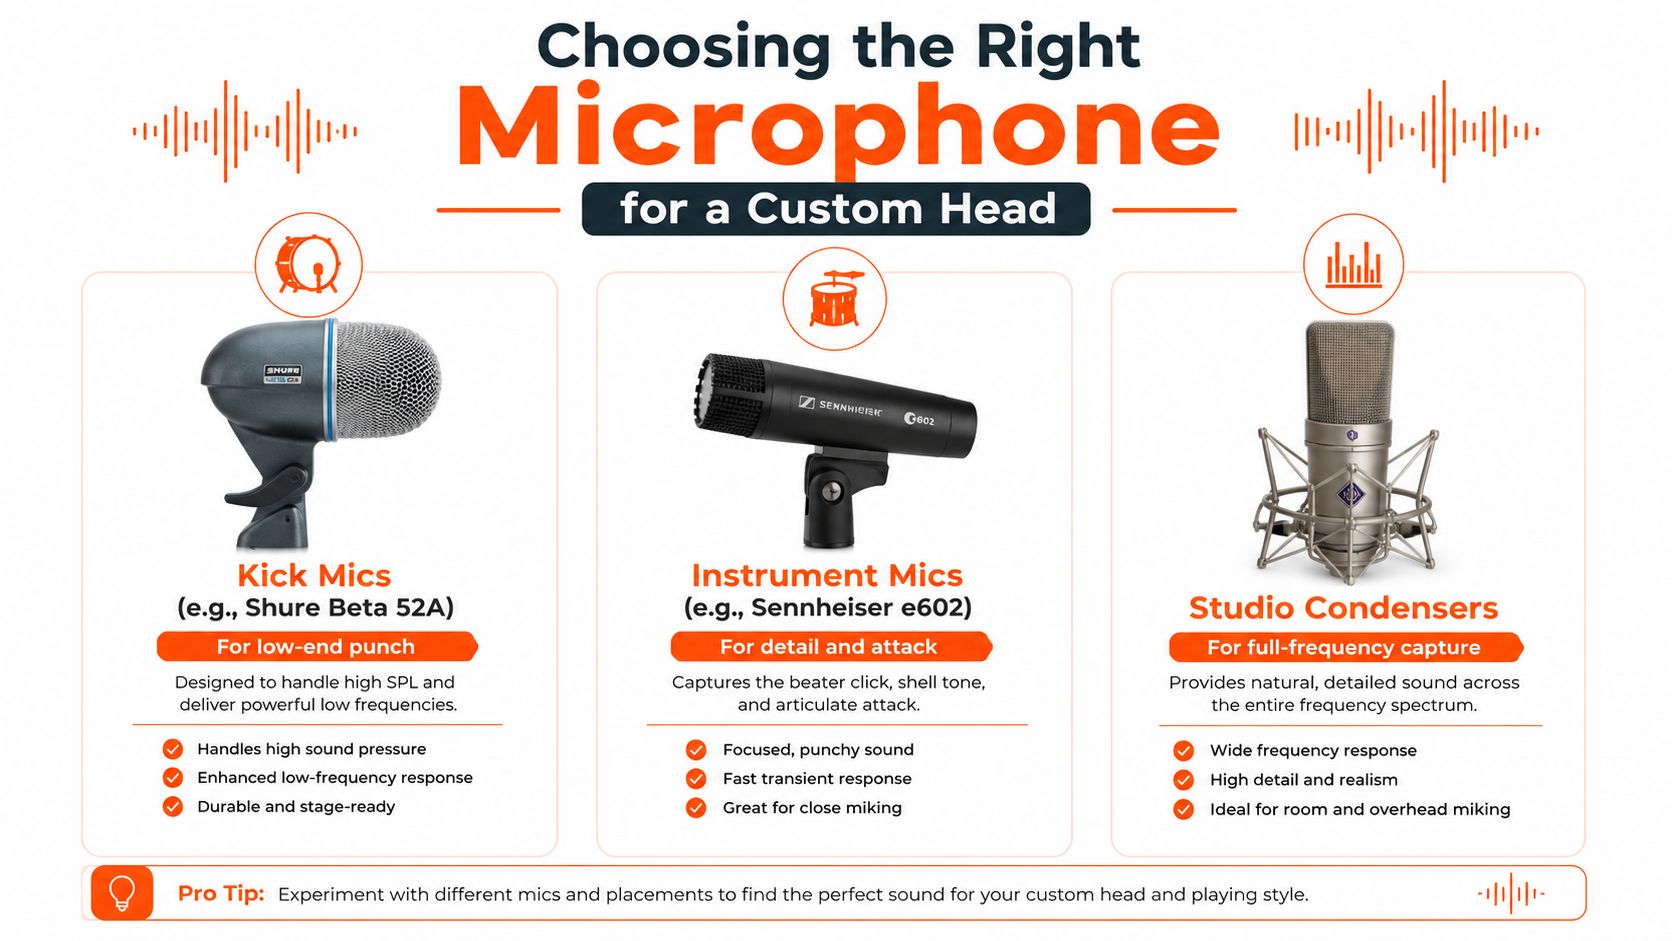
Match the mic to the port before the print is locked
A full-sized kick mic generally asks for room to breathe, which is why a larger port is so common on gig-ready heads. A compact instrument mic can work with a smaller offset opening, especially if the drummer wants the printed face to stay dominant. A condenser can make sense when the front head stays clean and the capture happens elsewhere, but that’s a studio choice, not the default for a loud stage.
The useful way to think about it is backwards from most shopping habits. Don’t choose the design first and hope the mic fits later. Choose the mic style the band will use, then shape the head layout around that choice so the art doesn’t have to fight the hole.
The cleanest results usually come from deciding what the microphone needs before deciding what the graphic needs to cover.
That’s especially true for buyers who split time between live shows and sessions. A touring band often needs a predictable ported head that makes setup fast and repeatable, while a studio player may care more about an unbroken front graphic and accept a different capture method. For a look at how custom-print workflow affects that decision, custom printed bass drum heads is the right next stop.
Inside the Drum Versus Outside the Drum
Kick placement starts with the sound you need, then the head has to make that placement possible. Inside the drum, the microphone gets more attack, less room, and a tighter view of the beater path. Outside the drum, it picks up more shell body, more air, and more of the room’s character. A custom head either supports that choice or gets in the way.
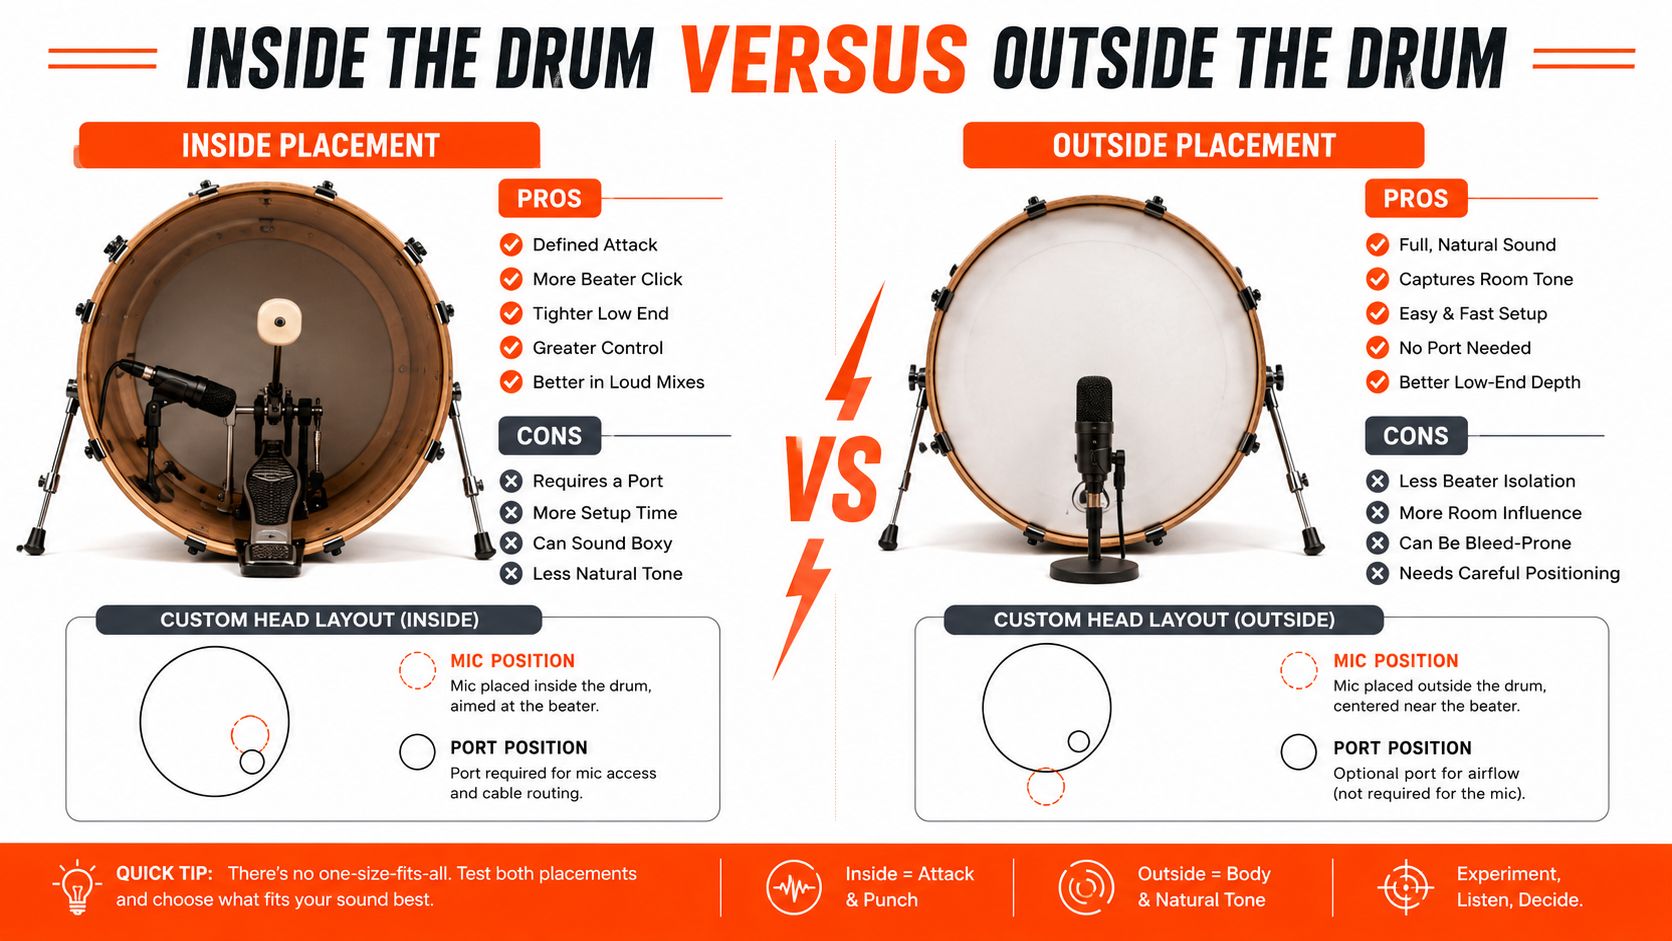
Why a ported front head changes the whole game
Inside-the-drum placement usually means the resonant head needs a port. That gives the engineer a direct path to the beater and the air moving inside the shell, which is why this setup shows up so often when the kick has to stay clear under dense guitars and loud cymbals. It also forces the design to work around the opening, so the artwork, port size, and port location all have to be planned together.
If you want a practical breakdown of those layout choices, start with bass drum port basics. Port position decides more than appearance. It affects where the mic can sit, how easily the player can set the kit up night after night, and whether the head still looks like the head the drummer ordered.
Outside placement is the other trade. It keeps the front head visually intact, which matters when the printed face is the main part of the design, but it gives up some isolation and some of the tight punch that live mixes often need. Distance matters here in plain acoustic terms. Moving a microphone from 1 foot to 2 feet away can cut direct sound by roughly half in acoustic energy, even though enclosed spaces change the result as reflected sound fills in some of the loss, according to Biamp’s acoustic concepts guide.
That is why “looks cleaner” and “sounds cleaner” are not the same thing. A no-port custom head can look excellent on a studio kit, but a ported head often earns its keep on a loud stage because it gives the microphone a stable, repeatable target. Shure’s live-sound guidance backs that close-placement approach as well, because closer placement improves gain-before-feedback and keeps the kick more controlled.
Exact Distances, Angles, and Port Locations
A kick mic only behaves well if the head gives it a workable path. A custom bass drum head can make that path easy or awkward, depending on port size, port height, port side, and how much artwork covers the usable area. Before printing a head, I check the layout against the mic plan and, if the measurements are still fuzzy, I send people to how to measure drum heads so the cut lands where the drum can use it.
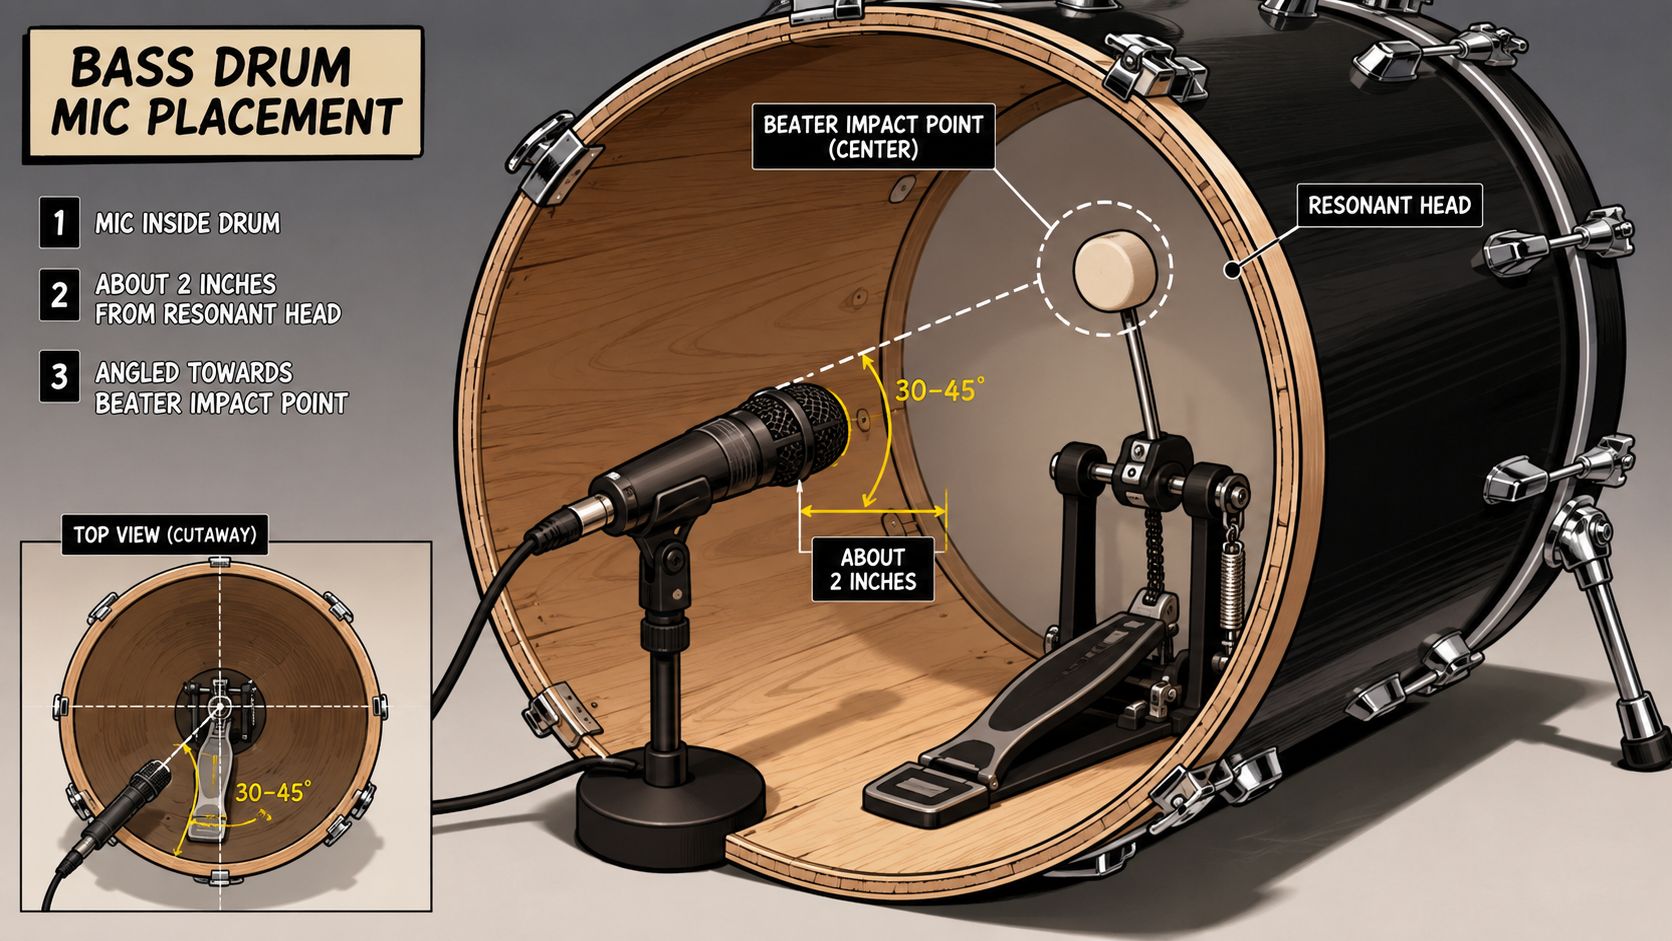
The safest starting point inside the drum is to keep the mic just a few inches past the resonant head and aim it toward the area the beater is already energizing. Outside the drum, the starting zone shifts farther back, because the mic has to hear enough of the batter head and enough of the shell to make the sound useful. The head layout determines whether either position is even practical.
Where the port should sit on the head
For an inside kick mic, a useful starting place is about 1 to 3 inches inside the resonant head, aimed roughly at the center of the batter head, with the capsule tilted slightly off-axis so the beater doesn’t blast straight into it. For outside placement, a starting point around 2 to 6 inches off the batter head works well, slightly off-center toward the beater strike zone, and angled about 45° off the head surface. For spoken-word mic practice, a different benchmark is about 6 inches from the mouth with a 45° off-axis angle, which shows how strongly distance and angle shape tone in general microphone work, according to Fifine’s voice placement guide.
For the head itself, the port side matters more than most buyers expect. A right-handed player usually wants the mic opening where it won’t clash with the beater path, monitor wedges, or their own footwork, so left-side or right-side placement becomes a real stage decision rather than a design preference. A centered high port can keep the graphic readable while still giving access, while a centered low port can make the mic path easier but may change the visual balance of the head.
Port height changes the resonance feel more than many buyers expect. A cut near the rim behaves differently from one that sits lower, and that can matter as much visually as it does sonically.
Port size matters just as much. A larger opening makes mic access easier and gives more freedom for the capsule angle, but it also takes more real estate out of the printed face and can change how much of the head still feels visually intact. A smaller cut preserves more artwork and keeps the front head looking cleaner, yet it narrows the working area and leaves less room if the engineer wants to move the mic after soundcheck. If the head art covers most of the shell, the port may need to move to the only open zone that still gives a straight shot inside.
The right question is where the mic can sit so the drum still sounds like itself and the front head still looks intentional. That answer belongs in the proof stage, before anything gets printed.
Phase and Polarity Checks You Can Run
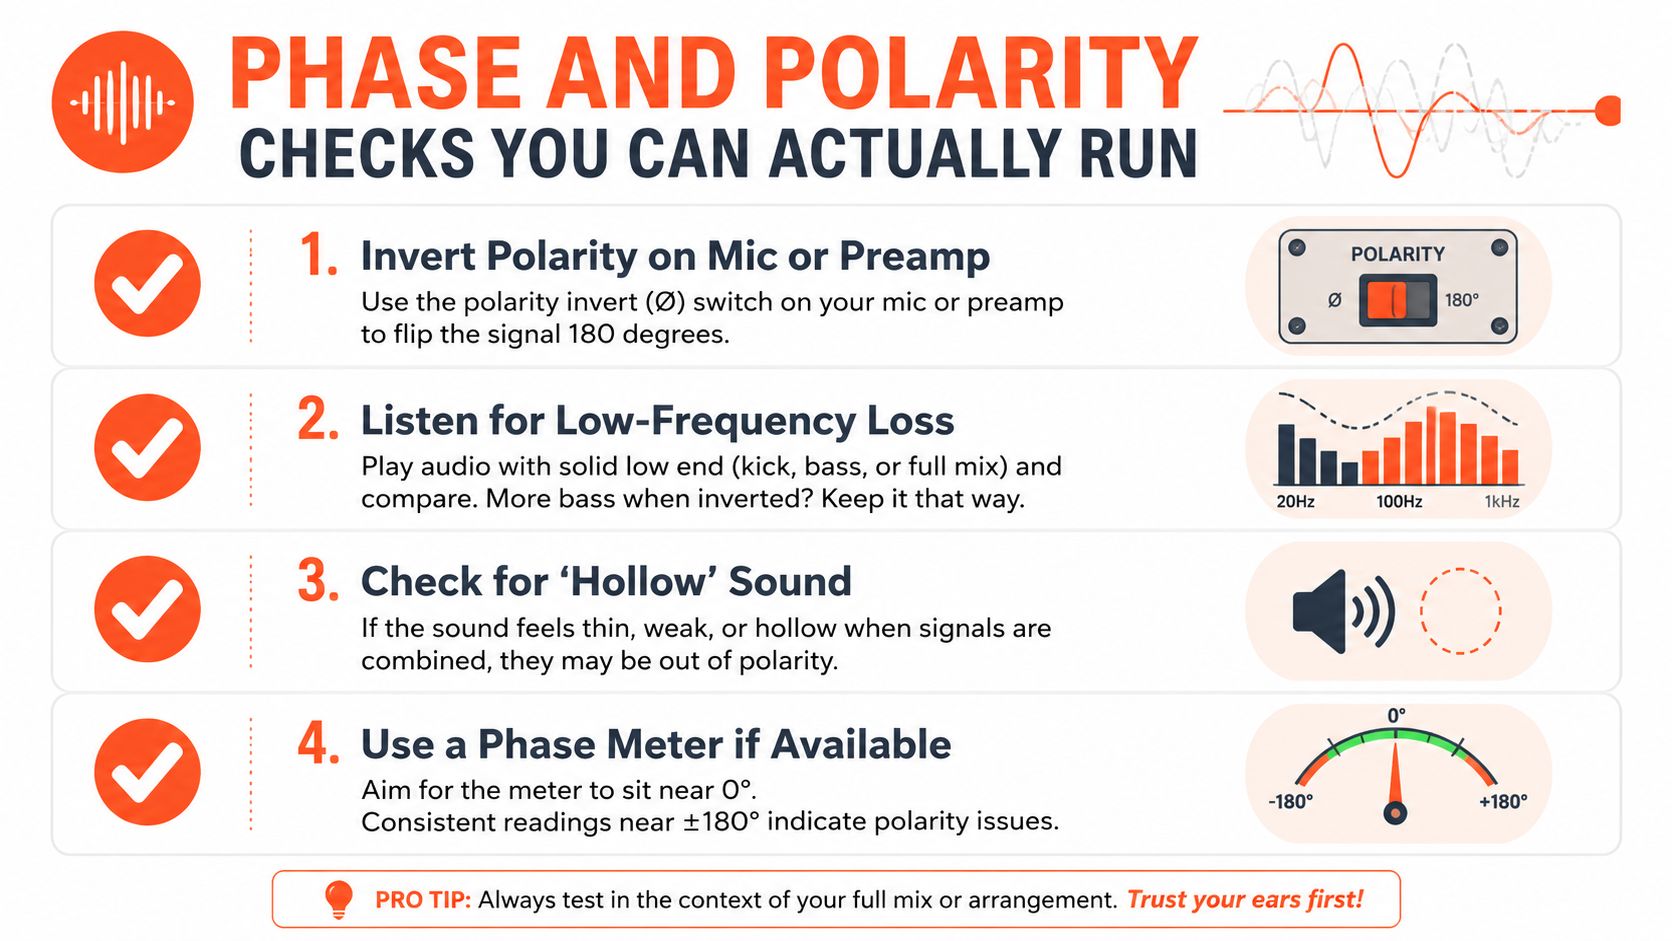
A kick that sounds huge by itself and weak in the mix usually has a phase problem hiding in plain sight. The drum is still making sound, but once the kick mic joins the overheads, the low end can thin out, the attack can blur, or the whole kit can seem to pull backward for a moment. That is not mystery, it is two waveforms fighting instead of adding.
Start with polarity before chasing EQ
Polarity reversal flips the positive and negative parts of a waveform so two mics can add together more cleanly. The simplest check is the old cable-flip test. Swap the XLR polarity on one kick source, listen to the combined result, and keep the setting that sounds fuller and less hollow. If the low end gets thicker, the fix is already in place.
That matters even more on a custom head with a port placed opposite the beater strike. A port cut in the wrong spot can force the inside mic into a position that makes the wave relationships messy before the signal even reaches the console. A well-placed opening gives the kick mic and overheads a better chance to work together, because the mic sees the impact in a more direct line and the head itself is not fighting the placement. The practical part starts before the mic ever goes on the stand, which is why drum head tuning and how it interacts with the mic belongs in the planning stage, not after the head is already printed.
The 3:1 distance rule is the other anchor to keep in mind for multi-mic work. When the kick mic and overheads are the only real pair in play on a small kit, the space between microphones still matters, because each mic has to stay far enough from the other source to avoid comb filtering and a thin, smeared blend. That is especially true when the head design limits where the port can sit and where the capsule can physically point.
What the room and stage are doing to the kick
Live stages make outside placement harder because cymbals bleed, wedges spill, and the drummer moves. Inside placement usually wins there because the mic stays sheltered and the resonant head port gives a more repeatable target. Studio sessions are more forgiving, so a portless front head can still work if the room is controlled and the visual front of the drum matters more than fast mic access.
The same placement logic shows up in how engineers treat distance on other sources. A handheld mic held close stays more predictable than one that drifts around, and a podium mic only behaves well inside a usable range. Kick work is no different. Close and consistent placement gives the engineer something dependable to work with, especially when the head design is part of the equation. If the head is still being specified, the article on custom bass drum head tuning and mic behavior is worth reading before the print is finalized.
EQ and Compression Starting Points That Fit the Head
EQ can’t rescue a bad port, but it can help the mic and the head settle into a mix faster. A kick channel usually needs cleanup in the low end, some control in the muddy middle, and enough attack to translate on smaller speakers. A custom head with a large printed graphic over the striking zone can change how that starting point feels, because the head can dampen the transient in ways a blank front head doesn’t.
| Band or Control | Starting Point | What It Solves |
|---|---|---|
| High-pass filter | Around 40 to 60 Hz | Clears rumble and subwoofer buildup |
| Low-mid dip | Gentle cut around 200 to 400 Hz | Reduces boxiness and muddy cardboard tone |
| Attack boost | Small lift around 2 to 4 kHz | Brings out beater click and definition |
| High shelf | Above 5 kHz to taste | Restores air and edge if the mic feels dull |
| Compression | Around 4:1 to 6:1, moderate threshold | Catches beater peaks while letting sustain breathe |
Let the head decide how much correction is needed
Printed surfaces can slightly change how the head feels under the mic, especially when the artwork covers a broad portion of the playing area. That doesn’t mean the sound is broken, it means the EQ may need a little less low-mid cutting and a little more attack shaping to keep the transient readable. The larger point is that channel strip moves should follow the head and mic choice, not replace them.
The safest rule is to treat these settings as starting points, not final answers. The phase and polarity checks matter more than a fancy EQ curve, because a clean signal path still beats a polished bad alignment. If the kick and overheads are already cooperating, the EQ only has to do a little finishing work.
Troubleshooting Placement Problems Before They Cost You a Gig
The worst kick problems usually show up five minutes before soundcheck ends, which is exactly when a custom head choice starts to matter. A port that seemed fine in the shop can turn awkward on a real riser, and a beautiful front graphic can become a problem if the mic can’t reach the right spot. Most failures are predictable once the cause is named.
Read the symptom, then fix the design choice
- Thin or weak kick: The port is too small, the mic is too far away, or the polarity is flipped. The quick fix is to shorten the path, check polarity, and move the mic closer. The design fix is a larger or better-placed port that matches the mic being used.
- Boomy or muddy kick: The port sits too low near the center, or the mic is catching a resonant point that exaggerates low-end bloom. The one-line fix is to shift the mic position and reduce how much room sound it’s hearing. The head fix is a higher or more offset port that doesn’t trap the capsule in the drum’s worst mode.
- Clicky or harsh kick: The mic is too close to the beater strike point, or the drum has no damping to calm the transient. The stage fix is to back the mic off slightly and angle it away from the direct hit. The layout fix is a port that lets the capsule sit where it hears attack without living inside the beater blast.
- Kick that fights the bass player: The issue is usually the phase relationship between the kick mic and the bass DI, not the drum head alone. The fix is to check alignment in context, not in solo. The design choice that helps most is a port position that gives the kick a cleaner, more repeatable phase reference from night to night.
A touring or worship band should usually spec the port as part of the order, because reliability matters more than visual purity when the drum gets mic’d every week. A studio player can get away with a cleaner, portless face if the capture happens elsewhere, but that decision should be made knowingly, not because the opening was forgotten during artwork approval. The easiest way to avoid the scramble is to design the head and the mic path together from the start, which is exactly what a good custom head order should make possible.
If the current kit still needs a front head that looks sharp and works well with the mic, Custom Bass Drum Head makes that part straightforward. Upload the artwork, choose the port side and layout around the mic you’ll really use, and order a head that looks right on stage without turning soundcheck into a compromise.